Banners for Foster Kids Birthday Partys Blog Hop


Hi! Welcome to Foster Kids Birthday Party's Blog Hop! Many of you may be familiar with CardMonkey's awesome banner hops for kids... I was so inspired by them that I wanted to find another opportunity to do good with my crafting. I happened upon a volunteer at Birthday Magic at a work event & followed up with them. They loved the idea of handmade birthday banners, so I put out the call and I was lucky to have 15 awesome crafters join me! So today you will get to see everyone's creations! ...
I used the Cricut Disney Font cartridge with the Charm option for cutting out the letters.  The Mickey Mouse shape came from the Cricut Disney cartridge.  I double cut each shape and adhered them together to make them stronger and more durable.  I then used the black and white twine from The Twinery to string them together.  To give it a little more sparkle I used Stickles to embellish the letters and mouse ears.  Here is a close up shot:

If you've never heard of Birthday Magic, you can see their site here - http://www.volunteersac.org/birthdaymagic/ BirthdayMAGIC is a program of the Volunteer Center of Sacramento, which provides personalized monthly birthday parties to children currently living in Sacramento area homeless shelters, transitional living facilities, community programs or residential treatment centers. The goal of BirthdayMAGIC is to brighten the lives of children by providing fun, meaningful and memorable birthday parties during what can be an awkward and challenging experience in their lives. Each month, children living in these shelters will celebrate birthdays – through financial support, volunteer help and the BirthdayMAGIC program, these wonderful children will receive a birthday party thrown in their honor. For more information on sponsoring a party please contact us at info@volunteersac.org or call (916) 567-3100. I'm looking forward to dropping off all the amazing banners For them to use in the parties! So now, sit back & enjoy all the great banners!!! You should have started the hop at: Jennifer Restivo http://www.craftycardgallery.blogspot.com/ And if you've been following along, you should have come from:
Madeleen Field http://madeleenscraftcorner.blogspot.co.nz/

Jamie Moore
http://craftygirl21.blogspot.com/

Susan Bermudez
http://susanascorner.blogspot.com/

Suzanne Roseberry
http://www.zannieberry.blogspot.com/

Shawn Mosch
http://craftychicsblog.blogspot.com/

Melissa Pinter
http://pinkpolkadotscrapping.blogspot.com/
 Here is where you should be going next: 
Lisa Thorpe http://bitbythecricutbug.blogspot.com/

Jessica Shelton http://jessicascraftshaque.blogspot.com/

Cristy Sova-Davis http://cristyscreationsfromtheheart.blogspot.com/

Tonia Williams www.twcards.blogspot.com/
 

Tie Blanket Instructions

I have been making a few tie blankets lately. It all started with making one for a raffle basket for my guide dog group. I found super cute dog fabric and was so happy with the results that I needed to make a couple for me and others. I took a recent trip to Arizona and shared some pictures of these blankets with my Aunt and she said that she would love to make one as well. So here are the directions that I created to help others make them.

Step 1:

Pick 2 fleece fabrics (you will need the same amount of each fabric). This will be the front and back of your blanket.

The following are guidelines for approximate amounts of fabric you might want:

- Small dog blanket = 1 Yard

- Large dog blanket = 1.5 Yards

- Normal size blanket = 2 Yards

- Long blanket = 2.5 Yards


Step 2:

Pick one fabric and spread it out on the floor with the side you want to show down facing the floor. The side that is up with be on the inside of your blanket.


Step 3:

Lay your second fabric directly on top of the first fabric. This time the side that you want to show will be facing up. Line up both fabrics as best as you can.


Step 4:

Cut around all edges of both fabrics at the same time using pinking shears. Be sure that you are cutting off all seams and labels.


Step 5:

Cut a square at each corner of the fabric using pinking shears. Cuts should be about 2-2.5 inches. Depends on how large you want your tie strips to be.
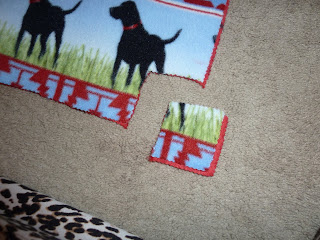

Step 6:

Work your way around the blanket making inward cuts through both fabrics at once. The cuts should be the same depth as your corner squares from the previous step. Each cut should be approximately 1 inch apart.


Step 7:

Start as one corner and work your way around the fabric tying the two pieces together. You should be making two knots with each set of strips. You want to tie the knots tightly so that they do not come apart in the wash.

When you are done your fabric might be slightly bunched towards the corners. Gently grab the edges of the fabric and pull them in opposite directions essentially stretching the fabric out until it lays flat. You will hear slight ripping sounds of the fabric as this will be evening out all of the cuts.

Step 8:

After stretching out the fabric the blanket should lay flat and is now ready to enjoy!